
Phone Photography Tips for Beginners
Are you looking to improve your outdoor phone photography? I’ve compiled some simple tips to help you make the most of your camera phone. We’ll look at light, composition, focus and a few easy techniques to help you capture everything from flowers and nature to family photos and holiday memories.


1. Start with Observing and Slowing Down
-
Before taking the photo, pause and look carefully.
-
What caught your eye first? Colour? Texture? Light? Shape?
-
Move around your subject before taking the shot - really consider the best angle.


Which of these three photos do you find most appealing?
They’re all of the same camellia, but by changing my position, composition and focus, each image creates a very different result.
-
The biggest improvement in your photography often comes from slowing down, observing your subject and making creative choices before taking the photo.
2. Think About Your Composition


Rule of Thirds
-
The Rule of Thirds is a fundamental composition guideline in photography that helps create balanced, engaging and dynamic images.
-
Imagine your screen divided into thirds both horizontally and vertically, creating a simple grid.
-
The idea is to place the most important elements of your shot along these grid lines or at the four points where they intersect – the "power points". When viewing images, people's eyes naturally gravitate toward these intersections rather than the centre of the frame.
Avoid Too Much Empty Space
-
Be careful of distracting backgrounds, such as trees or lampposts that seem to emerge from people's heads.
-
Fill the frame a little more.
-
Get closer than you think!
Try Different Angles
-
Crouch low for flowers.
-
Shoot through leaves or branches for depth.
-
Hold the phone horizontally or vertically and see which is best.
.jpg)
I had to crouch really low in this flower border to get a unique view of the Eiffel Tower! It was taken a mile away from the iconic landmark.
Leading Lines
-
Paths, arches, fences, flower borders can guide the eye through an image.
Versailles does leading lines very well!

3. Light Makes the Biggest Difference
For Flowers & People
-
Cloudy days are the best!
-
If it's a sunny day, look for shade whenever possible....or have patience and wait for intermediate cloud cover.
-
Bright sun creates harsh shadows.
-
Open shade gives softer colours and tones.
Here's me in direct sunlight squinting, with harsh shadows all over my face!
For Landscapes/Places

A few minutes later in open shade, looking a lot better with even lighting on my face.
-
Sunny days are the best! (Unless you want a moody sky)
-
Having the sun behind you will often give the brightest, clearest results, with well-lit landscapes, buildings and blue skies.
-
Shooting directly into the sun can lead to hazy and unfocused images.

The sun was behind me for this picture postcard shot of Wells Cathedral, with beautiful reflections in the pond too.
Golden Hour
Photographers often refer to the "golden hour" as the perfect time for photography as the light is softer - an hour after sunrise and one hour before sunset.
4. Hold Your Phone Steady

-
Pause before pressing the button – stand still and take your time.
-
Use both hands to keep the phone steady.
-
For low light/nightime, look to see if you can use a railing or bridge to rest the phone or prop it up.
5. Nature Photography Tips
Before taking the photo
-
Take a moment to really look at your subject before pressing the shutter.
-
Check for any distracting details, such as damaged petals, brown edges, or anything that takes away from the overall beauty of the scene.
-
Don't forget to avoid harsh sunlight - choose a subject in the shade (or create shade e.g. by placing your body in front of a flower).
-
Be aware that on a windy day, your phone may struggle to achieve sharp focus if your subject is moving around.
Frame your subject
-
Think about what first caught your eye and make that the focus of your photo.
-
Move around your subject and try different angles before taking the photo.
-
Don’t be afraid to move closer than you think. Filling the frame with a single flower, leaf or interesting detail can often create a much more striking image.

Further away, this clump of ferns is not very interesting.
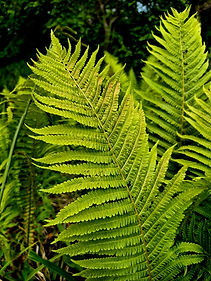
Taken up closer you can really see the structure of the fern, with a lovely leading line diagonally across the image.

Match Your Subject's Height
-
Crouch down for low flowers, fungi or grasses.
-
Photographing at the same level as your subject often creates a more engaging image.
-
Rest your phone on the ground for really small flowers like snowdrops....or fungi!
Background Matters
-
Move slightly to simplify the background. Play with angles.
-
Dark soil, shaded greenery or a plain area behind your subject can help colours and details stand out.
Use Depth
-
Look for a subject that stands slightly apart from its surroundings, with some space behind it. This can create a softer background and help your subject become the main focus.
-
For a different effect, focus on a flower or natural detail further back in the scene and allow nearby plants to blur softly in the foreground. This can create a natural frame and add depth to your image.


The acer here looks lost and the messy background is really distracting.
Here I've moved closer to the acer leaves and used depth to frame the image.
Leaves around the edges of the frame are nice and blurry.
6. Simple Outdoor Portrait Tips
-
Check what’s behind your subject - look out for twigs, branches or posts that can appear to be growing out of people’s heads!
-
Check your composition - stand a little closer and avoid leaving lots of empty space above people’s heads.
-
Take the photo at the same level as your subject, or slightly higher. A slightly higher angle can be more forgiving as we get older and may help avoid double chins.
-
If you’re standing in front of a pretty flower bush, leave some distance between your subject and the flowers to create a softer background blur.
-
If sitting on a bench or steps, sit forward with your bottom nearer the edge. A more upright posture usually looks better in photos than leaning back or slouching.
-
Don’t forget - avoid direct sun. Shade is your friend. Bright sunshine can cause squinting and create harsh shadows on the face.

My Mum took this photo. She's shorter than me and was on a downhill slope, so it's taken from below - far less flattering! I'm also too far away - there's way too much space above my head (it's taking up half the photo). Mum wanted to include the rhododendron bush, but it's competing for attention - the viewer doesn't know whether to look at me or the flowers!

My Dad took this much better photo after I gave a few instructions! He's higher than me and much closer in, so I'm now the main subject. The flowers are still framing beautifully around the edges.
Group Photos
-
To create warmer, more natural family photos, encourage people to connect with each other rather than standing separately. Leaning heads together, standing closer and putting an arm around one another can make a big difference.
-
Laughing/chatting photos feel more relaxed.
-
Watch for different heights of your subjects (tall on outside, small in middle) and check if anyone is standing on a slope.
Holiday & Scenic Photography Tips
Consider the Sky
-
Give more space to whichever part of the scene is most interesting. Dramatic clouds may deserve more sky, while colourful flowers or a beautiful foreground may deserve more of the frame.
Use the Rule of Thirds
-
Rather than placing the horizon directly in the middle, try positioning it roughly one-third or two-thirds of the way up the image. This often creates a more balanced composition.
Look for Leading Lines
-
Paths, rivers, fences and walls can help guide the viewer’s eye through the scene.
Keep it Straight

This photo taken in the Gower (Wales) is a great example of using a stone wall as a leading line. I then wanted the focus to be on the dramatic coastline, so I placed the sky in the top third of the image.
-
Take a moment to check that your horizon is level before taking the photo.
-
Some people naturally hold their phone at a slight angle, which can make horizons and buildings appear wonky.
-
If photographing buildings, try to keep your phone as upright as possible. If possible, take a few steps back rather than tilting the phone upwards to fit everything in.
-
Small adjustments can usually be corrected later using the straighten tool in your phone’s editing app.
7. Phone Camera Basics (iPhone + Android)
Most modern phones do a great job automatically. Good light, composition and taking your time will usually improve your photos more than complicated camera settings.
Below are a few simple phone tips to get you started. If needed, you can find device-specific camera settings with a quick search online or using AI tools.
Focus & Exposure
-
Most phones will automatically focus on what they think is the main subject. You’ll usually see a box, circle or highlighted area appear on the screen when focus has been found.
-
If the focus isn’t where you want it, tap the screen on your chosen subject (such as a flower or person’s face) to refocus.
-
On some phones, you can press and hold to lock focus and exposure (often called AE/AF Lock). You may then be able to adjust the brightness by sliding your finger up or down.
-
Take a moment to look carefully at your screen before pressing the shutter. Check that the important part of the image is sharp and in focus.
-
Don’t be afraid to take several shots and quickly review them in your gallery to make sure you’ve captured the image you wanted.

On my Samsung, the focus point is a circle and lights up yellow when focus in achieved.
Camera Features
-
Portrait Mode can work well for flowers, detail shots and individual portraits, helping to create a softer blurred background that makes the subject stand out.
-
Most newer phones automatically switch to close-up focus when you move nearer to a flower, rather than having a separate Macro mode.
-
When photographing flowers, don’t get too close or your phone may struggle to focus. If this happens, simply move back slightly and try again.
-
Always check your screen to make sure your chosen subject is sharp and in focus before taking the photo.
Avoid Heavy Zoom
-
Avoid heavy zooming where possible. Walking closer to your subject usually gives better image quality than using digital zoom.
Video Footage
-
Move slowly for calmer, smoother footage.
-
Keep clips short to retain interest.
-
Vertical video works best for social media.
-
Natural movement - like petals, grasses or leaves moving in the breeze - adds softness and atmosphere.

Hold the camera upright and steady, then pan around slowly for a beautiful scenic video.
File Settings
-
Check image quality settings on your phone are set to high.
-
Be careful of image quality settings in your apps e.g. check WhatsApp settings for media upload/download quality. (N.B. You can also change auto-download settings here to stop getting all your family’s holiday photos on your phone!)
-
Be aware of formats if you post on social media e.g. 4:5 works well for Instagram posts and 16:9 works well for reels.
8. Simple Editing Tips

Using my phone editor, I increased the light balance and contrast, then cropped using the grid guidelines.
-
Most phones have automatic enhancement or scene optimisation settings that can improve colour and detail.
-
Brightness is often the most useful adjustment - a small increase can make an image feel much fresher and lighter.
-
Filters can be helpful, but use them gently so colours still look natural.
-
Cropping can instantly improve composition and remove distractions around the edges.
-
Straightening tools are great for fixing wonky horizons or buildings in holiday photos.
-
Many newer phones also include object eraser/removal tools to tidy small distractions in the background.
Happy Snapping!
I hope these tips encourage you to slow down, look a little closer and enjoy capturing the moments that catch your eye. Whether you’re photographing flowers in the garden, friends on a day out or memories from your next holiday, a little thought about light, composition and focus can make a big difference.
Most importantly, have fun, experiment with different ideas and don’t be afraid to take lots of photos. The more you practise, the more you’ll discover your own style and the things you love to photograph.
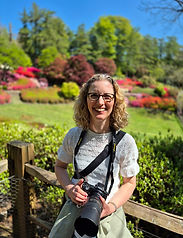
About Me
I'm Julia Morrison, a photographer based in Wokingham, Berkshire. For over 13 years, I've run Julia Morrison Photography, specialising in natural outdoor portraits that capture genuine moments and connections.
Alongside my portrait work, I've always been drawn to the colours, textures and seasonal beauty found in nature. Spending time outdoors with my camera inspired me to create Tangle & Bloom, a collection of fine art nature photography designed specifically for display in the home. Every image is carefully photographed and professionally printed to showcase the colour, detail and beauty of nature as wall art.
From vibrant flowers to delicate grasses and seasonal details, my work celebrates the often-overlooked beauty of the natural world and the joy it can bring into our homes.

Continue Exploring...
If you’ve enjoyed these tips and would like more photography inspiration, I’d love to stay in touch.
-
Explore the Tangle & Bloom collection of nature photography prints and wall art here
-
Follow Tangle & Bloom on Instagram and Facebook for seasonal inspiration and behind-the-scenes glimpses: Insta @tangleandbloomuk and Facebook tangleandbloom
-
Join the mailing list for updates on new collections, events and future photo walks: Tangle & Bloom newsletter
-
Discover my portrait photography at Julia Morrison Photography.
Whether you’ve joined me on a photo walk or simply discovered this guide online, I hope these tips encourage you to enjoy photography a little more, spend time outdoors and keep noticing the beauty around you.

001_JPG.jpg)

001_JPG.jpg)